
Small Call to Action Headline
BLACK HAMMOCK FARM PASTURE BREEDING MANAGEMENT PLAN
MESSAGE FROM THE OWNER
Black Hammock Farms has developed this rotational breeding protocol to establish a sustainable, year-round Katahdin sheep operation adapted to Central Florida's climate. This program reflects our commitment to professional agricultural practices, prioritizing animal welfare, reproductive efficiency, and operational excellence. By implementing quarterly breeding rotations with controlled group sizes, we ensure individualized ewe care during critical periods while maintaining continuous lamb production, demonstrating active commercial agricultural use. This protocol synthesizes research from university extension programs, veterinary best practices, and Katahdin Hair Sheep International recommendations. Our five birthing stalls and two monitoring paddocks provide care, distinguishing professional operations from hobby farms. This documented protocol serves as our operational manual, ensuring consistency and creating verifiable records demonstrating the commercial nature of our agricultural enterprise.
Quick Reference Guide
I. QUARTERLY BREEDING SCHEDULE
Cycle Structure
The 14-ewe flock will be divided into rotating groups, with 4 ewes bred at a time to ensure:
• No more than 4 ewes lambing simultaneously (matching available birthing stalls) - This controlled approach prevents overwhelming your five birthing stalls and ensures each ewe-lamb pair receives individual attention during the critical bonding period.
• Continuous year-round lamb production - Staggered breeding cycles mean you'll always have lambs at various stages of growth, providing consistent evidence of active commercial agricultural operations for your VAB appeal and demonstrating year-round farming activity.
• Adequate recovery time between lambings - Each ewe gets approximately 8-9 months between lambing cycles (5 months gestation plus 3-4 months lactation), which allows proper body condition recovery and maintains long-term reproductive health and productivity.
• Individual ewe tracking and care - Smaller breeding groups make it easier to monitor each animal's body condition, health status, and reproductive performance, allowing you to identify and cull poor performers while rewarding exceptional mothers with better management.
Annual Breeding Calendar
• Quarter 1 (January): Group A (4 ewes) - Lambing May-June - January breeding occurs during optimal cool weather when ewes cycle strongly, and the resulting May-June lambing happens during mild spring conditions that are ideal for newborn lamb survival in Florida's climate.
• Quarter 2 (April): Group B (4 ewes) - Lambing August-September - April breeding catches the tail end of prime breeding season, though August-September lambing occurs during peak heat requiring extra cooling measures like fans and shade, but lambs will be finishing during cooler fall months.
• Quarter 3 (July): Group C (4 ewes) - Lambing November-December - July represents your most challenging breeding period due to heat stress on both rams and ewes, with research showing reduced conception rates and longer time-to-settle, but December lambing weather is excellent and holiday lamb markets may be premium.
• Quarter 4 (October): Group D (2 ewes) + Rebreeds - Lambing February-March - October provides optimal breeding conditions with cool weather improving conception rates, and any ewes that failed to conceive in earlier cycles can be rebred here, with February-March lambing occurring during pleasant late winter weather.
Note: Summer breeding (July) may experience reduced conception rates due to heat stress - Research from Virginia State University shows that Katahdin ewes bred in July take an average of 25 days to first mating versus only 9 days in November, and embryonic loss can reach 12% due to heat stress on early-stage embryos, so budget extra time and don't be discouraged if this cycle has lower success.
II. PRE-BREEDING PROTOCOL (4-6 Weeks Before Ram Introduction)
A. Body Condition Scoring (BCS)
Target BCS: 3.0-3.5 at breeding
How to Perform BCS:
1.) Stand behind the ewe
2.) Place hands on both sides of the backbone in the loin area (between last rib and hip bones)
3.) Feel the prominence of the spinous processes (backbone) and transverse processes (horizontal bones)
4.) Score on 1-5 scale in 0.5 increments
BCS Scale:
• 1.0: Emaciated - spine extremely prominent and sharp - The vertebrae feel like a sharp edge with no covering at all, individual bones are clearly defined, and the ewe is skeletal in appearance; this ewe is in critical condition and may not survive breeding or pregnancy.
• 2.0: Thin - spine easily felt, little muscle or fat cover - You can easily feel each vertebra with light finger pressure, the transverse processes (side bones) are prominent, and there's minimal muscle mass; this ewe needs improved nutrition before breeding to avoid pregnancy complications.
• 2.5: Lean - spine felt with slight pressure, moderate muscle - The spine requires deliberate pressure to feel individual vertebrae, muscle tissue is present along the loin, and there's a thin but adequate fat cover; acceptable for breeding if nutrition will be improved, but not optimal.
• 3.0: IDEAL - spine requires firm pressure, well-muscled, adequate fat - You must press firmly to feel individual vertebrae, the loin area has good muscle development, and there's sufficient fat cover for energy reserves; this is the target condition for breeding most ewes.
• 3.5: OPTIMAL for breeding - smooth over spine, good muscle and fat - The backbone forms a smooth line requiring significant pressure to feel individual bones, excellent muscle development is evident when you squeeze the loin, and fat reserves are substantial; this is perfect for ewes carrying multiples.
• 4.0: Fat - hard to feel individual vertebrae, thick fat cover - You cannot easily distinguish individual vertebrae even with firm pressure, the loin feels rounded and well-padded, and fat deposits are obvious; ewes at this condition should NOT receive flushing and have reduced fertility.
• 5.0: Obese - cannot feel bone structure, excessive fat - The backbone is completely obscured by fat tissue making it impossible to feel vertebrae, fat deposits are visible in the brisket and along the topline, and the ewe is at serious risk for pregnancy toxemia and lambing difficulties; cull or implement strict weight loss program before breeding.
BCS Management Actions:
• Below 2.5: Increase feed quality, deworm, check teeth, separate for supplemental feeding - These thin ewes need immediate intervention including higher energy grain rations (add 1-1.5 lbs daily), deworming to reduce parasitic drain on body resources, dental examination to ensure they can chew properly, and separation from the main flock so they can eat without competition from more dominant animals; without improvement, they risk pregnancy toxemia and weak lambs.
• 2.5-3.5: Maintain current nutrition, ready for breeding - These ewes are in the ideal range with adequate body reserves to support conception, early pregnancy, and fetal development; continue your current feeding program and they should conceive readily and carry pregnancies successfully without metabolic complications.
• Above 4.0: Reduce energy intake, increase exercise, DO NOT flush - Fat ewes have reduced fertility because excess fat deposits around reproductive organs interfere with normal ovulation, and they face high risk of pregnancy toxemia because their bodies preferentially mobilize fat (leading to ketosis) rather than maintaining glucose; reduce grain to zero, provide lower quality hay, increase grazing distance, and never provide additional energy supplements.
A. Body Condition Scoring (BCS)
Each Ewe:
• Visual inspection for lameness, injuries, or illness - Walk through the flock and observe each ewe moving naturally; look for limping (indicates hoof problems or leg injuries), wounds or swelling, nasal discharge, coughing, diarrhea staining, or isolation from the group (sick sheep separate themselves); any abnormalities should be addressed before breeding as stressed or ill ewes have poor conception rates.
• Hoof trimming if needed (prevent lameness during pregnancy) - Examine each hoof for overgrowth, splitting, or signs of hoof rot (foul smell, dark tissue); trim conservatively to restore normal foot angle, as overgrown hooves cause lameness that prevents ewes from competing for food and leads to poor body condition; proper hoof care before breeding prevents mobility issues during late pregnancy when the ewe is already carrying extra weight.
• FAMACHA score for parasite load (target score 1-2) - Pull down the lower eyelid and compare the color of the inner membrane to the FAMACHA card; scores of 1 (red) and 2 (red-pink) indicate low parasite loads, while 3 (pink), 4 (pink-white), and 5 (white) show increasing anemia from blood-sucking worms; deworm only ewes scoring 3 or higher to maintain refugia (untreated parasite populations that haven't developed resistance), as ewes with heavy parasite burdens divert nutrients away from reproduction.
• Dental examination (broken mouth ewes need special attention) - Open the ewe's mouth and check that incisors (front teeth) meet the dental pad properly; older ewes may have missing, worn, or broken teeth ("broken mouth") which prevents them from grazing efficiently; these ewes need supplemental hay, softer feed, or pelleted rations to maintain body condition, and should be monitored closely or culled if they cannot maintain weight.
• Udder examination for lumps, hardness, or abnormalities - Palpate both halves of the udder feeling for hard lumps (abscesses or tumors), areas of hardness (scar tissue from previous mastitis), extra teats (can confuse lambs), or asymmetry; any udder damage reduces milk production and compromises lamb growth; ewes with significant udder problems should be culled as they cannot adequately raise lambs.
• Weight recording - Use a livestock scale or weight tape to record each ewe's weight; tracking weight alongside BCS helps you understand the relationship between skeletal size and body condition in your flock; a ewe losing weight between BCS checks indicates nutritional deficiency, parasitism, or illness, even if BCS hasn't changed dramatically yet.
Vaccinations (2-4 weeks pre-breeding):
• CD/T booster (Clostridium perfringens types C & D and tetanus) - This vaccination protects against enterotoxemia (overeating disease) and tetanus; giving it 2-4 weeks before breeding ensures the ewe has high antibody levels that will later pass to lambs through colostrum, providing them with passive immunity for their first 8-12 weeks of life; the timing is critical because antibody levels peak 2-3 weeks post-vaccination.
• If primary series not completed, start 4 weeks before breeding - Ewes that have never been vaccinated need two doses given 3-4 weeks apart to establish immunity; start this process at least 4 weeks before breeding (meaning 7-8 weeks before ram introduction) so the second dose can be given and antibodies can develop before conception; vaccinating pregnant ewes without prior immunity may not provide adequate colostral antibodies to lambs.
C. Flushing Protocol
Purpose: Increase ovulation rate by 10-20% through improved nutrition
Who to Flush:
• Ewes with BCS below 3.0 - These thinner ewes benefit from improved nutrition through increased ovulation rate, as rising energy intake signals to the ewe's reproductive system that food resources are abundant and conditions are favorable for raising multiple lambs; the improved nutrition helps eggs mature properly and supports early embryo development.
• First-time breeders (ewe lambs at 90-100 lbs minimum) - Young ewes must reach at least 70% of mature weight (90-100 lbs for Katahdins) before breeding because they're still growing themselves and pregnancy places enormous demands on their body; flushing helps support both their own growth and the development of their first lamb, improving conception rates and reducing the risk of difficult births due to underdevelopment.
• Ewes with history of single births - Some ewes consistently produce only single lambs due to lower natural ovulation rates; flushing these ewes with increased energy can stimulate the release of additional eggs, potentially increasing twinning rates and improving the overall productivity of your flock; tracking individual ewe performance helps you identify which animals benefit most from this practice.
Flushing Method:
1.) Begin 3-4 weeks before ram introduction - Starting flushing well before breeding allows the rising nutritional plane to stimulate follicle development and egg maturation; the ovaries respond to increasing energy by maturing more follicles, but this process takes 2-3 weeks, so early initiation maximizes the effect on ovulation rate at the time of actual breeding.
2.) Provide additional grain (0.5-1 lb per head daily) or high-energy supplement - The goal is to increase energy intake by approximately 25-50% above maintenance levels; this can be achieved through grain (corn, barley, or oats), commercial sheep pellets with 14-16% protein, or high-fat supplements; measure carefully and feed at the same time daily to maintain consistent intake across all ewes being flushed.
3.) Continue for 4 weeks into breeding period - Don't stop flushing once the ram is introduced; maintaining the increased nutrition through the first 3-4 weeks of pregnancy supports early embryo development and implantation; research shows that sudden drops in nutrition during early pregnancy cause embryonic death, so gradually taper flushing feeds after the first month rather than stopping abruptly.
4.) Use energy-dense feeds: corn, barley, or commercial sheep pellets - These grains provide concentrated energy in small volumes, which is important because ewes have limited rumen capacity; corn is highest in energy, barley is palatable and provides good energy, oats are lower energy but higher in fiber, and commercial pellets offer balanced nutrition with consistent quality; avoid feeding exclusively one grain type as variety improves nutrient balance.
5.) Ensure adequate protein (14-16%) - Energy alone isn't sufficient; protein is essential for egg development, hormone production, and early embryo growth; most flushing rations should contain 14-16% crude protein, which can be achieved by mixing grain with a protein supplement like soybean meal or using a commercial pelleted ration formulated for breeding ewes; inadequate protein limits the benefits of flushing.
DO NOT FLUSH:
• Ewes with BCS 3.5 or higher (may reduce conception) - Overconditioned ewes already have excessive fat deposits around reproductive organs which physically interfere with ovulation and embryo implantation; adding more energy actually decreases fertility in fat ewes and increases the risk of pregnancy toxemia later; these ewes need maintenance or reduced nutrition, not flushing.
• Overconditioned ewes - In addition to reduced conception rates, fat ewes face serious metabolic risks during pregnancy; their bodies preferentially break down fat stores when stressed (like during late pregnancy), which produces ketones that cause pregnancy toxemia; overfat ewes should lose condition gradually before breeding rather than being pushed to even higher body condition through flushing.
C. Flushing Protocol
Breeding Soundness Exam (BSE) - 4-6 weeks pre-breeding:
• Veterinary examination recommended
• Scrotal palpation for abnormalities
• Semen evaluation, if possible
• Body condition: Target BCS 3.5-4.0 (rams lose condition during breeding)
Heat Stress Considerations (Florida-specific):
• Heat stress can reduce ram fertility for up to 60 days - When a ram's testicular temperature rises above normal (which happens when ambient temperatures exceed 85°F), sperm production is damaged for an extended period because it takes approximately 49 days for sperm to fully mature; this means heat exposure in late May affects breeding ability through July, making pre-breeding cooling essential in Florida's climate.
• Provide shade, fans, and cool water - Rams must have access to natural shade from trees or artificial shade structures, good air circulation (fans in barns rated for outdoor use), and multiple sources of fresh cool water changed frequently; during extreme heat, wet the ground in shaded areas to provide evaporative cooling, and consider hosing down rams during the hottest part of the day if they tolerate handling well.
• If breeding July-September, ensure ram has been kept cool - For summer breeding success, rams need 60-70 days of temperature management before breeding begins; this means starting heat mitigation in May for July breeding; a ram that has been heat stressed will have poor sperm quality resulting in low conception rates, increased embryonic loss, and a longer breeding season with ewes cycling multiple times.
• Consider backup ram if primary ram exposed to heat stress - Having a second ram that has been properly cooled provides insurance; if your primary ram was subjected to heat stress (barn fire, equipment failure, unexpected heat wave), the backup ram ensures you don't lose the entire breeding season; young rams (7-12 months) are particularly sensitive to heat effects on fertility.
Ram-to-Ewe Ratio:
• Mature ram: 1:30-40 ewes
• Ram lamb (7-12 months): 1:15-20 ewes
• For controlled breeding with 4 ewes: 1 ram is sufficient
III. BREEDING PERIOD (35-42 Days)
A. Ram Introduction
Marking System:
• Fit ram with marking harness and crayon - The marking harness (also called a breeding harness or raddle) straps around the ram's chest and holds a colored crayon or paint stick positioned between his front legs; when he mounts and breeds a ewe, the crayon marks her rump with a colored stripe or smudge, providing visual confirmation of breeding activity without requiring constant observation. Ensure the harness is snug enough that it won't slip but not so tight that it restricts breathing or causes chafing; check the fit daily because rams can lose weight during breeding season, causing the harness to loosen and potentially fall off or rotate.
• Color 1 (Days 1-17): Light color (yellow or orange) - Start with a light, easily visible color like yellow, orange, or white for the first 17 days of the breeding period; this color will mark ewes during their first estrus cycle (ewes cycle every 17 days on average). The light color makes it easy to see fresh marks on dark-colored sheep and contrasts well with the darker color you'll use later. Apply the crayon generously to the marker, replacing or rotating it as it wears down (check daily), because a faded crayon won't leave clear marks and you'll lose track of which ewes have been bred.
• Color 2 (Days 18-35): Darker color (red or blue) - On day 18, remove the first crayon and replace it with a distinctly different, darker color like red, blue, or green; this second color marks ewes returning to estrus (cycling again after failing to conceive from the first breeding). By using contrasting colors, you can instantly identify which ewes bred only once versus which ewes required multiple breeding attempts. The color change is critical for management decisions: ewes marked only with the first color likely conceived on their first cycle, while ewes showing both colors may indicate fertility problems in either the ewe or ram.
• Change color at day 17 to identify returns to estrus - The 17-day mark is crucial because sheep have a 17-day estrous cycle (range 16-18 days); ewes that conceived during the first cycle won't show heat again, but those that didn't conceive will cycle back into heat around day 17. By changing crayon colors on day 17-18, you create a visual breeding history on each ewe's back: a single light mark means likely pregnant from first cycle; a dark mark overlaying a light mark means returned to estrus and was rebred; only a dark mark means she wasn't receptive during the first 17 days. This information helps you identify fertility issues early and make culling decisions later.
What Marking Tells You:
• Fresh mark: Ewe was bred that day - A fresh, vibrant mark with clear edges indicates the ram bred that specific ewe within the past 12-24 hours; the mark should be visible as a distinct colored stripe or patch on her rump, typically between the hip bones and tail base. Fresh marks tell you which ewes are actively cycling and receptive, helping you track breeding progress. Check marks daily and record which ewes have fresh marks and on what date, as this allows you to predict lambing dates (add 147-150 days to the breeding date) and identify ewes that haven't been marked at all after a week or more in with the ram.
• Mark 17-19 days old: Ewe returned to estrus (possible breeding failure) - When an old, faded mark is overlaid with a fresh mark in the second color (around days 17-19), this indicates the ewe cycled again because she didn't conceive from the first breeding; this is called "returning to heat" or "not settling." One return isn't necessarily concerning—conception rates aren't 100% even with healthy ewes and rams—but it does mean her lambing date will be 17 days later than if she'd conceived on first breeding. Document these returns carefully because patterns emerge: if the same ewe returns multiple times (marked 3+ times), she has a fertility problem and should be culled; if several ewes in the group return simultaneously, the ram may have fertility issues.
• If multiple ewes return to estrus: Check ram fertility - If you see multiple ewes (more than 20-30% of the group) being re-marked around day 17-19, this suggests a ram problem rather than multiple ewe problems; possible causes include low sperm count (from heat stress, poor nutrition, or age), poor libido (not breeding ewes properly despite mounting), or physical problems (injured penis, arthritis preventing proper mounting). Take immediate action: remove the ram and have a veterinary breeding soundness exam, or replace him with a backup ram. Don't wait to see if things improve, because every 17-day delay means lambing is pushed back 17 days, compressing your lambing season and potentially missing target markets or causing facility overcrowding.
B. Daily Monitoring
• Observe ewe-ram interactions - Spend 10-15 minutes daily watching the breeding group's behavior to assess breeding activity and flock dynamics; look for the ram actively seeking out ewes, sniffing their rear ends (detecting pheromones indicating estrus), and successfully mounting receptive ewes. Ewes in heat typically stand still when mounted (rather than running away), and the ram should complete breeding with characteristic "rearing back" behavior. Note if certain ewes are repeatedly avoiding the ram or if the ram seems uninterested in some ewes, as this may indicate social hierarchy issues, fear, or health problems affecting breeding success.
• Check harness tightness and crayon condition daily - The breeding harness takes significant stress from the ram's mounting activity and can loosen, slip sideways, or rotate as the ram loses weight during the energetically demanding breeding season; a loose harness won't mark ewes properly, leaving you without breeding records. Check that you can fit two fingers between the harness strap and the ram's chest—tight enough to stay in place but loose enough to allow normal breathing and movement. Examine the crayon stick for wear; if it's completely worn down or broken, replace it immediately because even one day without marking means you lose breeding data. Keep spare crayons on hand and rotate or replace them every 3-4 days for consistent marking.
• Record breeding dates for each ewe - Maintain a detailed breeding log noting the date each ewe receives her first mark (estimate conception date) and any subsequent marks (indicating returns to estrus); this record is essential for calculating expected lambing dates (add 147-150 days to first mark date), planning when to move ewes to birthing stalls, and identifying ewes with fertility issues. Create a simple chart with ewe ID numbers and mark dates with the crayon color noted; this low-tech system provides reliable lambing predictions and helps you manage facilities efficiently. Without accurate records, you'll have ewes lambing unexpectedly, miss the opportunity to provide special late-pregnancy nutrition, and struggle to identify problem breeders.
• Monitor for lameness or illness - Breeding season is stressful on rams (who lose significant body condition from constant activity) and can be taxing on ewes, particularly if nutrition is inadequate or if they're fighting off infections; daily observation allows you to catch problems early before they affect breeding success. Watch for limping (hoof problems or leg injuries), nasal discharge or coughing (respiratory infections), standing apart from the group (indicating illness), or lack of appetite. Any ram that becomes lame or ill should be removed immediately and replaced with a backup ram to ensure breeding continues, because a sick or injured ram won't breed ewes effectively and will fall behind the breeding schedule.
• Ensure adequate feed and water access - Breeding increases energy demands dramatically—rams may lose 10-20% of body weight during a 35-42 day breeding season, and cycling ewes also have elevated energy needs; check that feeders have adequate space for all animals to eat without excessive competition (at least 18 inches of feeder space per head), and that feed is fresh and palatable. Provide multiple water sources (at least 2 for a group of 4-5 animals) to ensure access even if one is fouled or dominated by a pushy individual. Monitor water consumption; decreased water intake indicates problems (frozen water, contamination, or illness in the flock) that will rapidly affect body condition and breeding performance. Breeding activity peaks during cooler parts of the day, so ensure animals have eaten well before the ram becomes most active.
C. Nutrition During Breeding
• Continue high-quality forage - Maintain access to excellent pasture or premium hay throughout the breeding period, as forage provides the foundation of the sheep's diet and supplies essential nutrients, fiber for rumen health, and the bulk of their daily energy needs. During breeding season, forage quality is particularly important because both rams and cycling ewes have elevated energy requirements; poor quality forage (stemmy, mature, or weather-damaged hay) won't provide adequate nutrition even if consumption increases. Aim for leafy, green hay or lush pasture with at least 10-12% protein and high digestibility; in Florida's climate, consider warm-season perennial grasses like Bahia or Bermuda grass, though their nutritional quality declines rapidly in summer heat.
• Maintain or slightly increase grain for flushed ewes - If you've implemented a flushing program for ewes with BCS below 3.0, continue the supplemental grain feeding (0.5-1 lb per head daily) through the first 4 weeks of the breeding period to maximize conception rates and support early embryo development; don't make sudden feed changes during breeding as this can disrupt the ewe's hormonal balance and reduce fertility. After the first 3-4 weeks of breeding (when most ewes have been bred and embryos are implanting), gradually taper grain supplementation over 7-10 days rather than stopping abruptly, because sudden diet changes during early pregnancy cause embryonic loss. For ewes that entered breeding at optimal BCS (3.0-3.5), maintain current nutrition without additional grain unless body condition begins dropping.
• Free-choice mineral supplement - Provide a commercial sheep mineral supplement formulated specifically for breeding animals, ensuring it's labeled for sheep (NOT for goats or cattle, as these may contain copper levels toxic to sheep); minerals like selenium, zinc, and vitamin E are critical for reproductive success, supporting egg quality, sperm function, and early embryo development. Place mineral in covered feeders protected from rain (which dissolves minerals and makes them unpalatable), and locate feeders in high-traffic areas where sheep pass frequently to encourage consumption. Monitor intake by noting how quickly mineral is consumed; if a 50-lb bag lasts more than 2-3 months for 14 ewes, consumption is too low and you may need to change mineral brands or feeder location to improve palatability and access.
• Fresh, clean water always available - Water is the single most important nutrient, and even mild dehydration reduces feed intake, impairs reproductive function, and stresses both ewes and rams during the demanding breeding period; sheep require 1-2 gallons per head per day (more in hot weather or when lactating), so a group of 4 ewes plus a ram needs 5-10 gallons daily, meaning a 15-gallon tank lasts only 1.5-3 days. Check water twice daily (morning and evening) to ensure tanks are full, clean, and free of debris, algae, or contaminants; scrub and refill tanks at least weekly, more frequently in hot weather when algae grows rapidly. In Florida's heat, place water tanks in shade to keep water cool (sheep prefer cool water and drink more of it) and prevent algae growth; if water temperature exceeds 85-90°F, sheep may reduce consumption, impairing breeding performance and body condition maintenance.
IV. PREGNANCY MANAGEMENT
A. Early Pregnancy (Days 1-50)
Critical Period: Embryo Implantation
Nutrition:
• AVOID sudden feed changes (can cause embryonic loss)
• AVOID weight loss (causes early embryonic death)
• Continue flushing nutrition for the first 30 days
• After 30 days, return to maintenance ration
• Target: Maintain BCS or slight increase
Management:
• MINIMIZE STRESS (avoid shearing, transport, extreme handling)
• Continue routine monitoring
• No pregnancy diagnosis until day 30+
Pregnancy Diagnosis Options:
• Day 30-45: Blood test (PAG) - 95% accuracy, no false negatives - Pregnancy-associated glycoprotein (PAG) blood testing can be performed by your veterinarian or through mail-in services; it detects proteins produced by the placenta with 95% accuracy for confirming pregnancy and 99% accuracy for confirming non-pregnancy; the test is most reliable after 30 days when PAG levels are sufficient for detection, and false positives are minimal; this is an excellent option if you need early pregnancy confirmation for management decisions.
• Day 40-60: Ultrasound - can detect multiples - Real-time ultrasound (transabdominal or transrectal) is highly accurate for pregnancy diagnosis and can determine if a ewe is carrying singles, twins, or triplets; this information is valuable for nutrition management since ewes carrying multiples need 75-100% more energy in late gestation; ultrasound can also detect fetal viability and identify problems, though it requires either purchasing equipment ($2,000-10,000) or hiring a technician (typically $5-8 per ewe).
• Day 60-90: Doppler device or rectal palpation - Doppler ultrasound devices detect fluid-filled structures (pregnant uterus) through sound waves and are relatively inexpensive ($400-500) for farm use; rectal palpation by an experienced person can identify pregnancy by feeling the enlarged uterus; both methods are 85-95% accurate during this window but cannot reliably count fetuses and require more skill than blood testing.
• Day 90+: Visual/palpation (udder development, abdominal enlargement) - After three months of gestation, pregnancy becomes obvious through physical signs: the ewe's abdomen visibly enlarges (especially right side), udder development begins (particularly noticeable 4-6 weeks before lambing), and you can sometimes feel fetal movement by pressing on the right flank; while this "method" is free, it provides very late confirmation and offers no opportunity to manage non-pregnant ewes differently or prepare for multiples.
B. Mid-Pregnancy (Days 51-110)
Maintenance Phase
Monthly Monitoring:
• BCS assessment (target: maintain 3.0-3.5)
• Weight check
• Visual health inspection
• FAMACHA scoring
• Hoof inspection
Nutrition:
• Good quality forage (pasture or hay)
• Minimal to no grain supplementation
• Free-choice mineral
• Clean water
Management:
• Group pregnant ewes together
• Separate from rams and open ewes
• Maintain exercise and normal activity
• Monitor for illness or injury
C. Late Pregnancy (Days 111-147)
CRITICAL PERIOD: 70% of fetal growth occurs in last 6 weeks
BCS Target at Day 110: 3.0-3.5
• Singles: BCS 3.0-3.5
• Twins: BCS 3.5-4.0
• If below target: Increase energy immediately
Nutrition - GRADUALLY INCREASE:
• Weeks 15-16 (Days 105-112): Begin grain introduction at 0.25-0.5 lb/day
• Week 17 (Days 113-119): Increase to 0.5-1.0 lb/day
• Week 18 (Days 120-126): Increase to 1.0-1.5 lb/day
• Week 19-21 (Days 127-147): Maintain 1.5-2.0 lb/day based on body condition
• Ewes carrying multiples: Increase by 25-50%
Grain Mix Recommendations:
• 14-16% protein
• High energy (corn, barley, oats)
• Calcium supplementation is important
• AVOID high calcium feeds (alfalfa) until after lambing to prevent milk fever
Critical Monitoring - DAILY CHECKS:
1.) Appetite: Any ewe off feed is an EMERGENCY
2.) Behavior: Lethargy, isolation, grinding teeth
3.) Movement: Staggering, weakness, inability to rise
4.) Vision: Apparent blindness (pregnancy toxemia sign)
5.) Urine: Test for ketones if any concerns
WARNING SIGNS - Pregnancy Toxemia (Ketosis):
• Loss of appetite (FIRST SIGN - ACT IMMEDIATELY) - A pregnant ewe going off feed is an emergency; pregnancy toxemia progresses rapidly once appetite drops, and early intervention is the only hope for saving the ewe and lambs; if you notice any pregnant ewe in late gestation not eating with the group, separate her immediately, take her temperature, and contact your veterinarian the same day.
• Depression, lethargy - The affected ewe appears dull and unresponsive, shows little interest in her surroundings, and lags behind the flock; she may stand with her head down for extended periods or lie down when others are active; this mental dullness indicates the brain is being affected by abnormal metabolism and ketone accumulation.
• Separation from flock - Sick sheep instinctively isolate themselves, and a ewe with pregnancy toxemia will often stand or lie apart from her flock mates; this behavior is an evolutionary response to prevent predator attention on the group, but in a management context it's a red flag requiring immediate investigation.
• Separation from flock - Sick sheep instinctively isolate themselves, and a ewe with pregnancy toxemia will often stand or lie apart from her flock mates; this behavior is an evolutionary response to prevent predator attention on the group, but in a management context it's a red flag requiring immediate investigation.
• Star-gazing, apparent blindness - The ewe holds her head abnormally high (tilted back looking at the sky - "star-gazing"), presses her head against walls or fences, and appears unable to see obstacles; this indicates severe neurological involvement from ketones and suggests an advanced case with poor prognosis.
• Grinding teeth - Bruxism (tooth grinding) in sheep indicates pain or severe discomfort; in pregnancy toxemia, this likely reflects abdominal pain from metabolic disturbances and the accumulation of toxic ketone bodies; it's often accompanied by a hunched stance.
• Muscle tremors - Fine to coarse muscle trembling, particularly visible in the facial muscles and shoulders, results from nervous system dysfunction caused by hypoglycemia (low blood sugar) and ketosis; tremors that progress to convulsions indicate terminal stages.
• Sweet/fruity breath odor (acetone) - As the body breaks down fat for energy in the absence of adequate glucose, it produces ketone bodies including acetone, which is exhaled; this distinctive sweet or nail-polish-remover smell on the breath is pathognomonic (definitively diagnostic) for ketosis, though not all people can detect it.
• Down and unable to rise (ADVANCED - POOR PROGNOSIS) - Once a ewe with pregnancy toxemia is recumbent (lying down unable to stand), the prognosis is grave with mortality exceeding 80%; at this stage, multiple organ systems are failing, the fetuses are likely dead or dying, and even aggressive veterinary treatment rarely succeeds; prevention is truly the only effective strategy.
Facility Preparation (2 weeks before lambing):
• Clean and disinfect birthing stalls
• Stock supplies (see Section VI)
• Prepare lambing record sheets
• Test heat lamps
• Organize emergency contact information
Vaccination Booster:
• CD/T booster 3-4 weeks before lambing (Days 126-133)• Flood-tolerant forage species
• Provides passive immunity to lambs via colostrum
V. LAMBING PROTOCOL
A. Pre-Lambing Signs (24-48 hours before)
• Udder development (tight, full) - The ewe's udder fills with colostrum in the final days before lambing, becoming firm, warm, and distended; you should be able to express thick, yellow colostrum from the teats; this "bagging up" is one of the most reliable indicators that lambing is imminent, particularly in experienced ewes, though first-timers may bag up less dramatically.
• Vulva swelling and reddening - The vulva (external opening) becomes elongated, relaxed, and puffy as the pelvic ligaments soften in preparation for birth; the tissue color changes from pale to reddish-pink; this swelling allows passage of the lamb and is triggered by hormonal changes in late pregnancy.
• Restlessness, pawing, getting up and down - The ewe exhibits unusual behavior patterns including repeatedly lying down then standing back up, pawing at the ground or bedding (nest-making behavior), and general inability to settle; she's responding to early uterine contractions and the discomfort of pre-labor.
• Isolation from flock - Many ewes seek solitude before lambing, moving away from the main group to find a quiet corner or separate area; this natural behavior reduces disturbance during the vulnerable birthing process and allows the ewe to focus on her lambs without competition or interference from flock mates.
• Mucus discharge from vulva - As the cervix begins to dilate, the mucus plug that sealed the cervix during pregnancy is expelled, appearing as thick, stringy, clear or slightly bloody discharge; often called "showing" or "the water bag breaking" (though the actual water sac comes later), this discharge may be visible on the vulva, tail, or ground where the ewe has been lying.
• Loss of appetite - Many ewes go off feed 12-24 hours before lambing as early contractions cause abdominal discomfort; however, if a ewe has been off feed for several days before lambing signs, consider pregnancy toxemia; a brief loss of appetite immediately before labor is normal, but prolonged anorexia is concerning.
• Hollow appearance behind ribs - As the fetus drops into the birth canal and the pelvic ligaments relax in preparation for delivery, a visible hollow or "sunken" area appears on either side of the tail head (between the hip bones and tail base); running your hand over this area, you can feel the softening of normally taut ligaments, and this change indicates birth is likely within 12-24 hours.
• Dropping of hindquarters - The overall shape of the ewe's rear end changes as the pelvis tilts and the lamb moves into position; looking at the ewe from behind, her pin bones (on either side of the tail) appear more prominent and wider apart, and the entire rump looks lower and fuller; this structural change facilitates passage of the lamb through the birth canal.
ACTION: Move ewe to individual birthing stall
B. Stages of Labor
Stage 1: Early Labor (2-12 hours)
•Restlessness, pawing at ground
• Getting up and down repeatedly
• Looking at flanks
• Mild contractions (not visible)
• Cervix dilating
• May have mucus discharge
ACTION: Observe quietly, minimize disturbance
Stage 2: Active Labor and Delivery (30-60 minutes per lamb)
• Restlessness, pawing at the ground
• Getting up and down repeatedly
• Looking at flanks
• Mild contractions (not visible)
• Cervix dilating
• May have mucus discharge
Normal Presentation:
• Front feet first (hooves pointing up)
• Nose resting on front legs
• Head and shoulders together
INTERVENTION TIMELINE:
• Water sac visible >1 hour without progress: CHECK
• Active pushing >30 minutes without lamb: ASSIST
• Lamb partly visible >20 minutes without progress: ASSIST
• Ewe exhausted, weak, or distressed: ASSIST IMMEDIATELY
Stage 3: Placenta Expulsion (15 minutes to 2 hours after last lamb)
• Reddish tissue expelled
• One placenta per lamb (may come together or separately)
• Should pass within 12 hours
• DO NOT PULL on retained placenta
C. Normal Delivery - Non-Intervention Protocol
If delivery progressing normally:
1.) Observe from a distance
2.) Do NOT touch ewe or lamb unless necessary
3.) Allow ewe to clean lamb
4.) Confirm lamb breathing and vigorous
5.) Confirm lamb nursing within 30-60 minutes
6.) Record time of birth, lamb ID, sex, birth weight
Lamb Vigor Assessment:
• Excellent: Head up within 30 seconds, attempting to stand within 5 minutes, strong suckle reflex - A vigorous lamb responds immediately to birth by lifting its head, shaking off fluid, and vocalizing; within 5 minutes it's scrambling to get its legs under itself, and when you place a finger in its mouth, it sucks vigorously; these lambs typically find the udder and nurse successfully within 30 minutes with no assistance needed and have the highest survival rates.
• Good: Head up within 2 minutes, standing within 15 minutes, nursing within 1 hour - A healthy lamb that took slightly longer to respond due to a longer birth process or being chilled; these lambs need observation to ensure they successfully nurse within an hour, may benefit from drying with towels, and should be watched to confirm colostrum intake, but generally don't require intervention beyond monitoring.
• Poor: Slow to respond, weak, cold, not nursing - INTERVENTION NEEDED - A compromised lamb that may have experienced oxygen deprivation during birth, was born to a malnourished ewe, or is hypothermic; this lamb needs immediate warming, possibly assisted breathing (if gasping or not breathing well), colostrum supplementation via tube or bottle, and intensive monitoring every 2-3 hours; without intervention, survival is unlikely and even with care, these lambs face higher mortality and may have lasting neurological effects from birth stress.
D. When to Assist - Dystocia Recognition
CALL FOR ASSISTANCE IF:
• Stage 1 labor exceeds 8-12 hours - While early labor can last this long, extended Stage 1 labor may indicate a problem with cervical dilation, fetal malpresentation preventing engagement of the cervix, or uterine inertia (weak contractions); if a ewe has been showing early labor signs (restlessness, pawing, looking at flanks) for more than 12 hours without progressing to active pushing, examination is warranted to determine if intervention is needed.
• Stage 2 labor exceeds 30 minutes without progress - Once a ewe begins strong abdominal contractions (visible pushing), delivery should proceed relatively quickly; if she's been actively pushing for 30 minutes without a lamb or water sac appearing, or if pushing has started but stopped, there's likely an obstruction, malpresentation, or maternal exhaustion requiring assistance.
• Water sac visible >1 hour without lamb appearing - The clear, fluid-filled amnion (water sac) typically appears and ruptures during the early pushing phase, followed quickly by the lamb; if the water sac has been visible for an hour or more without the lamb presenting, the lamb may be malpositioned, too large, or the ewe's contractions may be inadequate to advance the birth.
• Abnormal presentation (see below) - Any presentation other than two front feet with the nose resting on top requires correction; common malpresentations include head back, one or both legs back, breech (backward), transverse (sideways), or twins tangled together; these positions prevent normal delivery and the lamb cannot be born without repositioning.
• Ewe showing extreme distress or exhaustion - A ewe in severe distress may vocalize excessively, strain violently, thrash around, or show signs of shock (pale membranes, rapid breathing, weakness); exhaustion is indicated by lying flat out, giving up pushing despite having contractions, or appearing mentally dull; both conditions worsen rapidly and require immediate intervention to save ewe and lambs.
• Lamb visible but not progressing for 15-20 minutes - If you can see parts of the lamb (feet, nose, or tail) but the ewe's contractions aren't advancing it despite active pushing, the lamb is stuck; this often happens when shoulders are too large for the pelvic opening, when one leg is back creating an abnormal width, or when a malpresentation hasn't been fully corrected; gentle traction (pulling) during contractions may help, but if no progress is made within 15-20 minutes, more aggressive intervention or veterinary help is needed to prevent fetal death from prolonged compression of the umbilical cord.
Preparation for Assistance:
1.) Wash hands and arms thoroughly with betadine or chlorhexidine - Cleanliness is critical to prevent introducing bacteria into the uterus, which causes life-threatening infections (metritis) that can kill the ewe within days; scrub your hands and arms up to the elbow with surgical scrub just as you would before human surgery, paying special attention to under fingernails and between fingers; this simple step dramatically reduces infection risk.
2.) Put on clean OB sleeves/gloves (elbow-length) - Disposable obstetrical sleeves create a barrier that protects both you and the ewe; they should extend to your shoulder, be made of thin plastic that allows you to feel what you're doing, and be used only once per ewe; shoulder-length sleeves are essential because you may need to reach deep into the uterus to reposition a lamb, and short gloves leave your forearm exposed to contamination.
3.) Have obstetric lubricant ready - Generous lubrication is essential for safe lamb delivery; use commercial obstetric lubricant (not petroleum jelly, which isn't water-soluble), applying it liberally to your gloved hand and the ewe's vulva before entry, and reapplying as needed during the procedure; proper lubrication reduces trauma to the birth canal, makes repositioning easier, and helps the lamb slide through the pelvis.
4.) Have clean towels available - You'll need multiple clean towels for drying lambs after delivery (which stimulates breathing and prevents hypothermia), wiping your hands between examinations, cleaning the ewe if needed, and providing a clean surface for newborns; terry cloth towels work well because their texture aids in vigorous rubbing; have at least 3-4 towels ready per expected lamb.
5.) Have someone help if possible - An assistant is invaluable during dystocia; they can restrain the ewe (holding her head or supporting her in a sitting position), hand you supplies without you having to break sterility, receive and dry lambs while you deliver additional ones, take notes on what you're finding, and call for veterinary help if needed; if working alone, position all supplies within easy reach before beginning, and consider using a lambing gate or pen corner for restraint.
Examination Procedure:
1.) Restrain ewe (sitting position or standing with helper)
2.) Apply generous lubricant to gloved hand and ewe's vulva
3.) Insert hand gently into vagina
4.) Identify what is presenting:
• Count legs (should be 2 front legs)
• Follow each leg back to body (ensure same lamb)
• Locate head position
• Determine if single or multiple lambs
E. Common Dystocia Presentations and Corrections
1. Head Back:
• Two front feet visible, no head
• Correction: Push lamb back, cup hand over muzzle, and guide the head forward between the legs
• Pull gently when positioned correctly
2. One Leg Back:
• One front leg and head visible
• Correction: Push the lamb back, locate the missing leg, cup the hoof in palm, and bring it forward alongside the head
• Both legs and head must come together
3. Breech (Backward):
• Tail visible, or rear legs (hooves pointing down)
• Two Options:
- Option A (preferred if space): Push lamb back, rotate 180°, bring front legs and head forward
- Option B (if necessary): Pull backward - WORK QUICKLY as umbilical cord will break before head is out and lamb will try to breathe
• When pulling breech: Hold both hind legs AND tail in hand (prevents tail catching on pelvis)
• Pull downward toward ewe's hocks during contractions
4. Twins Coming Together:
• More than 2 legs visible, or 2 heads
• Correction:
- Identify which parts belong to which lamb
- Push one lamb back completely
- Position first lamb correctly
- Deliver first lamb
- Re-enter and position second lamb
5. Large Lamb/Small Pelvis:
• Proper presentation, but the lamb was too large to pass
• Signs: Head or legs out but no progress despite strong contractions
• Action: Gentle traction during contractions, pull downward toward hocks
• If no progress after 10-15 minutes: VETERINARY ASSISTANCE NEEDED (possible C-section)
Preparation for Assistance:
1.) Wash hands and arms thoroughly with betadine or chlorhexidine - Cleanliness is critical to prevent introducing bacteria into the uterus, which causes life-threatening infections (metritis) that can kill the ewe within days; scrub your hands and arms up to the elbow with surgical scrub just as you would before human surgery, paying special attention to under fingernails and between fingers; this simple step dramatically reduces infection risk.
2.) Put on clean OB sleeves/gloves (elbow-length) - Disposable obstetrical sleeves create a barrier that protects both you and the ewe; they should extend to your shoulder, be made of thin plastic that allows you to feel what you're doing, and be used only once per ewe; shoulder-length sleeves are essential because you may need to reach deep into the uterus to reposition a lamb, and short gloves leave your forearm exposed to contamination.
3.) Have obstetric lubricant ready - Generous lubrication is essential for safe lamb delivery; use commercial obstetric lubricant (not petroleum jelly, which isn't water-soluble), applying it liberally to your gloved hand and the ewe's vulva before entry, and reapplying as needed during the procedure; proper lubrication reduces trauma to the birth canal, makes repositioning easier, and helps the lamb slide through the pelvis.
4.) Have clean towels available - You'll need multiple clean towels for drying lambs after delivery (which stimulates breathing and prevents hypothermia), wiping your hands between examinations, cleaning the ewe if needed, and providing a clean surface for newborns; terry cloth towels work well because their texture aids in vigorous rubbing; have at least 3-4 towels ready per expected lamb.
5.) Have someone help if possible - An assistant is invaluable during dystocia; they can restrain the ewe (holding her head or supporting her in a sitting position), hand you supplies without you having to break sterility, receive and dry lambs while you deliver additional ones, take notes on what you're finding, and call for veterinary help if needed; if working alone, position all supplies within easy reach before beginning, and consider using a lambing gate or pen corner for restraint.
F. Assisted Delivery Technique
Golden Rules:
1.) NEVER pull except during a contraction - The ewe's uterine contractions are essential for dilating the cervix and birth canal; pulling between contractions risks tearing delicate tissues because they haven't been stretched by the contraction; time your traction to coincide with the ewe's pushing efforts, which you can feel as increased tension and resistance; rest between contractions to allow tissues to recover and the ewe to rest.
2.) Pull downward toward ewe's hocks (follows natural birth canal curve) - The birth canal curves downward and backward, not straight out; pulling horizontally or upward fights against this natural anatomy and can cause severe trauma to the ewe's pelvis and spine; always angle your pull downward toward the ground (as if you're trying to deliver the lamb between the ewe's hind legs), which follows the pelvis's natural curve and prevents injury.
3.) Use gentle, steady pressure - NOT jerking motions - Jerking, yanking, or applying sudden force tears tissues, breaks the lamb's ribs or legs, and can cause permanent nerve damage to both ewe and lamb; instead, apply smooth, gradually increasing pressure, hold it steady throughout the contraction, release slowly as the contraction ends, and repeat; think "firm and persistent" not "hard and fast," and remember that a lamb stuck for 20 minutes is better than a dead lamb delivered in 5 minutes through excessive force.
4.) If resistance: STOP, reassess position - Resistance means something is wrong with the presentation or position; continuing to pull risks catastrophic tears to the ewe or killing the lamb; when you meet resistance, stop immediately, insert your hand again to check lamb position, ensure both legs belong to the same lamb and are correctly positioned, verify the head is coming with the legs, and check for twins presenting simultaneously; repositioning takes time but saves lives.
5.) Time limit: If cannot deliver within 20 minutes, CALL VETERINARIAN - Once you've begun active intervention, you have a limited window before fetal death from oxygen deprivation; 20 minutes of careful manipulation is reasonable, but beyond that, the lamb's survival becomes unlikely and the ewe faces increasing risk of trauma, shock, and infection; don't let pride prevent you from calling for help; an experienced veterinarian can perform a cesarean section if needed, saving both ewe and lambs if you act in time.
Pulling Technique:
1.) Grip both front legs just above hooves
2.) As ewe contracts, apply steady downward traction
3.) Gentle side-to-side rotation may help shoulders pass
4.) Once shoulders through, support head
5.) Continue gentle pull until lamb fully delivered
Post-Assisted Delivery:
1.) Clear mucus from lamb's nose and mouth
2.) Rub lamb vigorously with towel
3.) Ensure lamb breathing (should gasp within 30 seconds)
4.) Place lamb in front of ewe's head
5.) If ewe exhausted: Check for additional lambs
6.) Administer oxytocin if prescribed by veterinarian (helps expel remaining lambs and placenta)
VI. IMMEDIATE POST-LAMBING CARE
A. Lamb Processing (First 30 Minutes)
Priority 1: Breathing and Warmth
1.) Confirm lamb breathing (chest rising and falling)
2.) Clear airways if mucus present (suction bulb or clean with finger)
3.) Vigorous rubbing with clean towel (stimulates breathing and circulation)
4.) If not breathing: Swing gently (holding rear legs) to clear airways, then rub vigorously
Priority 2: Navel Treatment
1.) Dip navel in 7% iodine solution
2.) Ensure complete coverage of umbilical stump
3.) Repeat once more 12 hours later
4.) Prevents entry of bacteria causing joint ill
Priority 3: Identification
1.) Weigh lamb on hanging scale
2.) Ear tag with unique ID number
3.) Record: Dam ID, lamb ID, sex, birth weight, time of birth, birth order (if multiples), any complications
Priority 4: Colostrum Intake
• CRITICAL: Lambs must receive colostrum within 2 hours of birth, ideally within 30-60 minutes - Colostrum is the thick, yellow first milk that contains concentrated antibodies (immunoglobulins) which protect the lamb from disease; lambs are born with essentially no immune system and depend entirely on absorbing these maternal antibodies from colostrum; however, the lamb's intestinal lining can only absorb these large antibody molecules for the first 12-24 hours of life, with absorption efficiency dropping dramatically after 6 hours; the sooner colostrum is consumed, the better the absorption and the stronger the lamb's immune system; lambs that don't receive adequate colostrum within the first few hours have significantly higher mortality rates from infections and are more susceptible to pneumonia, scours (diarrhea), and joint ill throughout their lives.
• Watch lamb locate udder and begin nursing - Don't assume nursing is happening; actually observe the lamb find the teat, latch on correctly (with the entire teat in its mouth, not just the tip), and see the tail wagging rhythmically which indicates active suckling and milk transfer; first-time mothers may be uncooperative, moving away from the lamb, and twins may compete or one weaker twin may be pushed away; intervention is needed if the lamb is aimlessly wandering around the ewe, sucking on ears or legs instead of teats, or if 30-45 minutes have passed without successful nursing.
• Lamb should nurse vigorously and frequently - After the first successful nursing, watch for repeated nursing bouts; lambs typically nurse every 30-60 minutes initially, taking small meals frequently; vigorous nursing means the lamb latches quickly, sucks strongly (you can see jaw working and throat swallowing), and nurses for 30-60 seconds before releasing and resting; weak nursing (nibbling at the teat without strong suction) or infrequent nursing (less than every 2-3 hours) suggests a problem requiring intervention through supplementation.
Colostrum Check - Confirm Intake:
• Observe successful nursing (lamb's tail wagging while sucking)
• Gently feel lamb's belly (should be full and rounded)
• If not nursing within 1-2 hours: INTERVENE
B. Hypothermia Prevention (Florida winters)
Normal Lamb Temperature: 102-103°F
Cold Lamb Signs:
• Shivering - Visible muscle trembling is the lamb's attempt to generate heat through muscle activity; shivering requires energy, and a lamb that's very cold or weak may stop shivering (which is actually a worse sign), so a shivering lamb still has reserves but needs immediate intervention before those reserves are depleted.
• Cold to touch (especially ears, legs, mouth) - Normal lambs feel warm to your hand; a cold lamb has lost body heat to the environment faster than it could generate warmth; the extremities (ears, legs, mouth) cool first because blood is shunted to the core organs, so if these areas feel cold, the lamb is significantly hypothermic; checking inside the mouth is particularly useful because mouth temperature reflects core temperature better than skin temperature.
• Weak, lethargic - A cold lamb lacks energy for normal activity; instead of being bright and active, it lies still, responds slowly to stimulation, has weak cries or no vocalization, and shows little interest in standing or nursing; this weakness results from energy being diverted to heat production rather than movement, and from reduced metabolic function at low body temperatures.
• Unable to stand or nurse - Severe hypothermia causes muscle weakness and mental depression that prevents the lamb from standing or sucking; without the ability to nurse, the lamb cannot obtain the energy (from milk) needed to warm itself, creating a downward spiral; at this stage, warming must be accomplished externally (heat lamp, warming box) and energy must be provided through tube feeding because the lamb cannot save itself.
• Temperature below 100°F - Normal lamb body temperature is 102-103°F; below 100°F is hypothermic, below 98°F is severe hypothermia requiring aggressive warming, and below 95°F is critical with poor prognosis; always use a rectal thermometer (digital is fine) inserted about 2 inches into the rectum for 1 minute to get an accurate reading, as estimating temperature by feel is unreliable.
Treatment:
1.) Move to warm, dry, draft-free area
2.) Dry thoroughly with towels
3.) Use heat lamp (3 feet above lamb) OR warming box
4.) Warm colostrum and tube feed if lamb cannot nurse
5.) Monitor temperature every 30 minutes until stable
Heat Lamp Safety:
• Hang securely 3-4 feet above bedding
• Use red bulb (250 watt)
• Provide area where lamb can move away from heat
• Never leave unattended overnight
C. Ewe Care Post-Lambing
Immediate (0-2 hours):
1.) Offer warm water
2.) Offer high-quality hay
3.) Placenta should pass naturally (do not pull)
4.) Check for additional lambs (palpate abdomen, observe for continued contractions)
First 24 Hours:
1.) Monitor ewe's temperature (normal 101-103°F)
2.) Observe for signs of distress, fever, or excessive bleeding
3.) Check udder: Both sides producing milk, no heat or hardness
4.) Confirm passing of placenta(s) (count - should equal number of lambs)
5.) Monitor appetite and water intake
6.) Observe ewe-lamb bonding
Lactation Nutrition (First 3-4 Months):
• Energy requirements 75-100% above maintenance
• Singles: 2.0-2.5 lbs grain daily
• Twins/Triplets: 3.0-4.0 lbs grain daily
• High-quality forage free choice
• Fresh water always available
• Free-choice mineral supplement
VII. MONITORING PROTOCOL (Birth to Weaning)
A. Daily Checks (Days 1-7)
Lambs:
• Nursing regularly (every 1-2 hours)
• Active, alert, bright eyes
• Tail wagging during nursing
• Normal elimination (urination, soft yellow feces)
• No signs of: diarrhea, lethargy, weakness, swollen joints
Ewes:
• Eating and drinking normally
• Maternal behavior normal (protecting, allowing nursing)
• Udder soft, no heat or hardness
• Vaginal discharge (normal: red to pink, decreasing daily; abnormal: foul odor, brown, excessive)
• No fever, lameness, or distress
B. Weekly Monitoring (Weeks 1-16)
Weight Gain Check:
• Birth: 8-12 lbs (twins average 8 lbs each)
• Week 1: Should gain 0.5-0.75 lbs/day
• Week 4: Should double birth weight
• Week 8: 40-50 lbs
• Week 12: 60-75 lbs
• Week 16 (weaning): 80-100+ lbs
Development Milestones:
• Day 3-5: Begin nibbling hay/grain
• Week 2-3: Eating solid food regularly
• Week 4-6: Grazing pasture
• Week 8: Fully functional rumen
Health Monitoring:
• FAMACHA scoring every 2-4 weeks
• Body condition assessment
• Check for injuries, limping, or illness
• Observe nursing frequency (decreases with age)
C. Weaning Protocol (3-4 Months)
Preparation:
• Lambs should be eating solid food well
• Lambs minimum 80 lbs OR 3 months old (whichever comes later)
• Ewes should be reducing milk production naturally
Weaning Methods:
Method 1: Abrupt Weaning (Recommended for commercial operation)
1.) Separate lambs completely from ewes
2.) Move ewes to new pasture (out of earshot)
3.) Keep lambs in familiar area
4.) Reduce ewe grain to zero immediately (helps dry up milk)
5.) Provide ewes with lower quality hay for 2-3 days
6.) Monitor ewes daily for mastitis (hot, hard udder)
Method 2: Gradual Weaning
1.) Separate lambs from ewes for increasing periods
2.) Day 1-2: Apart 8 hours, together 16 hours
3.) Day 3-4: Apart 16 hours, together 8 hours
4.) Day 5-7: Apart 24 hours, together briefly
5.) Day 8+: Permanent separation
Post-Weaning Ewe Management:
• BCS target: Minimum 2.0
• Allow 60 days recovery before rebreeding
• If BCS below 2.5: Provide better nutrition for 30-45 days before breeding
• Deworm if needed
• Check udder for mastitis daily for first week
VIII. EMERGENCY PROTOCOLS
A. Pregnancy Toxemia (Ketosis) - EMERGENCY
Recognition:
• Off feed (earliest sign)
• Depressed, isolated
• Staggering, incoordination
• Star-gazing or apparent blindness
• Grinding teeth
• Muscle tremors
• Sweet/fruity breath (acetone smell)
• Down, unable to rise (advanced)
Immediate Action:
1.) Call Veterinarian immediately - treatment is time-critical
2.) Move ewe to quiet, comfortable area
3.) Offer fresh water
4.) Offer highly palatable feed (molasses, sweet feed)
Treatment (Veterinarian or under Vet guidance):
• Propylene glycol: 2-3 oz orally 2-3 times daily
• OR corn syrup: 4-6 oz orally 2-3 times daily
• Dextrose 5% IV if available
• Calcium borogluconate (some cases)
• B-complex vitamins
• Induce labor or C-section if near term (vet decision)
Prognosis:
• Early intervention (still eating): Good
• Advanced (down, not eating): Poor (80% mortality)
Prevention:
• Proper late-gestation nutrition (see Section IV.C)
• Avoid stress, sudden diet changes
• Maintain proper BCS (not too fat, not too thin)
• Monitor high-risk ewes closely (fat ewes, thin ewes, triplets)
B. Dystocia - When to Call Veterinarian
CALL VET IMMEDIATELY IF:
• Cannot determine presentation after examination
• Cannot correct malpresentation within 15-20 minutes
• Lamb too large to pass despite proper position
• Ewe exhausted, weak, or shock symptoms
• Excessive bleeding
• Uterine prolapse
• No progress after 30 minutes of assisted delivery attempts
While Waiting for Vet:
• Keep ewe calm and quiet
• Do not continue forceful pulling
• Keep lamb moist if partially delivered (wet towels)
• Take ewe's temperature
• Note: Time in labor, when assistance started, what you found on examination
C. Hypothermic Lamb - EMERGENCY
Severe Hypothermia (<97°F):
1.) Dry thoroughly
2.) Warm gradually (heating pad set on low, warm towels, warming box)
3.) DO NOT use heat lamp on severely cold lamb (can cause shock)
4.) Warm colostrum to body temperature (103°F)
5.) If lamb cannot swallow: Tube feed 2-4 oz warm colostrum
6.) If lamb CAN swallow: Bottle feed small amounts frequently
7.) Once temperature >100°F, can move to heat lamp
8.) Monitor temperature every 15-30 minutes
Tube Feeding Procedure:
1.) Measure tube from lamb's nose to last rib
2.) Mark tube at this length
3.) Pass tube gently over tongue, into esophagus (left side of neck)
4.) Should pass smoothly (if resistance, do not force)
5.) Check placement: Blow through tube - should not hear air in lungs
6.) Administer warmed colostrum slowly
7.) Remove tube slowly
D. Weak or Non-Nursing Lamb
Causes:
• Hypothermia
• Difficult birth
• Premature
• Low birth weight
• Ewe has no milk
• Lamb cannot find/reach teats
Intervention:
1.) Assess lamb temperature (treat hypothermia first)
2.) Check ewe's udder (milk present?)
3.) If milk present: Strip small amount, place on lamb's mouth
4.) Hold lamb to teat, support body
5.) If lamb will not nurse: Milk ewe, bottle or tube feed lamb
6.) First feeding: 2-4 oz colostrum within 2 hours of birth
7.) Repeat every 2-3 hours: 4-6 oz per feeding first 24 hours
Colostrum Requirements:
• First 24 hours: 10% of body weight
• Example: 8 lb lamb = 12-13 oz total colostrum in first 24 hours
• Front-load colostrum (50% in first 6 hours)
Colostrum Sources:
1.) Fresh from dam (best)
2.) Fresh from another ewe in milk
3.) Frozen colostrum (thaw in warm water, not microwave)
4.) Commercial colostrum replacer (last resort)
E. Mastitis in Lactating Ewe
Signs:
• Hot, hard, swollen udder
• Off feed
• Fever (>104°F)
• Reluctant to let lamb nurse
• Abnormal milk (clots, blood, watery)
• Lameness (from pain)
Action:
1.) Take ewe's temperature
2.) Call veterinarian
3.) Separate lamb (may need supplemental feeding)
4.) DO NOT milk out udder (can worsen infection)
5.) Veterinarian will prescribe antibiotics
6.) May need anti-inflammatories
7.) Check lamb for adequate nutrition
Prevention:
• Proper nutrition (avoid excess energy in late lactation)
• Clean, dry bedding
• Watch for teat injuries
• Abrupt weaning in high-producing ewes
F. Prolapse (Vaginal or Uterine)
Vaginal Prolapse (Before Lambing):
• Pink tissue protruding from vulva
• Usually late pregnancy
• Can recur with each pregnancy
Action:
1.) Call Veterinarian
2.) Keep tissue clean and moist (clean wet towel)
3.) Prevent ewe from lying down if possible (use prolapse harness)
4.) Vet may reposition and use retention sutures or harness
5.) Watch closely until lambing (may need C-section)
Uterine Prolapse (After Lambing):
• Large mass of red tissue expelled after delivery
• VETERINARY EMERGENCY
Action:
1.) Call a Veterinarian IMMEDIATELY
2.) Keep tissue clean and moist (wrap in clean, wet towel)
3.) Prevent trauma to tissue (protect from ground, ewe, lambs)
4.) DO NOT attempt to replace yourself
5.) Vet will clean, replace, and suture
6.) Ewe will need antibiotics and anti-inflammatories
7.) DO NOT REBREED this ewe (culling recommended)
G. Milk Fever (Hypocalcemia)
Signs (Usually 2-6 weeks after lambing):
• Stiff gait, incoordination
• Muscle tremors
• Weakness, difficulty standing
• Decreased appetite
• Progresses to collapse, coma
Action:
1.) Call Veterinarian IMMEDIATELY
2.) Keep ewe quiet and calm
3.) Vet will administer calcium IV (slow - can cause heart problems)
4.) May need repeated treatments
5.) Usually responds rapidly to treatment
Differentiation from Pregnancy Toxemia:
• Milk fever: AFTER lambing, responds to calcium
• Pregnancy toxemia: BEFORE lambing, does not respond to calcium
• Calcium test: Give calcium - if no improvement in 15 minutes, probably not milk fever
Prevention:
• Avoid high calcium diet in late pregnancy (no alfalfa)
• Feed grass hay during the dry period
• Gradually increase calcium after lambing
H. Emergency Contact Information
Keep Posted in Lambing Area:
• Primary Veterinarian: Name, Phone, Emergency Line
• Backup Veterinarian: Name, Phone
• Poison Control (if needed): Number
• Experienced Shepherd (mentor): Name, Phone
• Nearest 24-hour Emergency Vet Clinic: Name, Address, Phone
Emergency Supply Kit - Always Stocked:
• Obstetric lubricant
• OB sleeves/gloves (elbow length)
• Betadine or chlorhexidine surgical scrub
• 7% iodine solution (for navels)
• Clean towels (multiple)
• Feeding tube (lamb size)
• Bottles and nipples
• Propylene glycol or corn syrup
• Heat lamp with spare bulbs
• Thermometer (digital rectal)
• Colostrum (frozen or replacer)
• Electrolyte solution
• Scissors (for cutting umbilical cord if needed)
• Hemostats or forceps
• Record sheets and pens
• Flashlight with spare batteries
• Weak lamb warming box or heating pad
• Injectable calcium (if prescribed by vet)
• Oxytocin (if prescribed by vet)
• Thermometer (digital rectal)
Antibiotic (if prescribed by vet)
IX. FLORIDA-SPECIFIC CONSIDERATIONS
A. Heat Stress Management (April-October)
Critical Periods:
• Breeding in July (highest risk - embryonic loss common)
• Late pregnancy in summer months
• Lambs finishing in summer
Heat Stress Signs:
• Panting, open-mouth breathing
• Elevated respiration rate (>100 breaths/minute)
• Seeking shade constantly
• Reduced feed intake
• Elevated body temperature (>104°F)
• Weakness, staggering, collapse
Heat Mitigation Strategies:
1.) Shade: Provide natural or artificial shade for all animals
2.) Water: Multiple water sources, kept in shade, fresh and cool
3.) Ventilation: Fans in barns or covered areas
4.) Timing: Breed in cooler months when possible (avoid July if high heat expected)
5.) Diet: Offer high-energy feeds during coolest parts of day (evening)
6.) Minimize Handling: Do procedures early morning or evening
7.) Ram Management: Keep rams cool 60 days before breeding
Breeding Season Adjustments:
• November breeding (optimal): Lambing March-April (mild weather)
• January-March breeding: Lambing June-August (hot - provide extra cooling)
• April breeding: Lambing September (cooling weather)
• July breeding (challenging): Lambing December (cool weather but reduced conception rates expected)
B. Parasite Management (Year-Round Issue in Florida)
Enhanced Monitoring:
• FAMACHA scoring every 2-4 weeks (more frequent in hot, wet months)
• Fecal egg counts periodically
• Body condition scoring monthly
Integrated Parasite Control:
1.) Rotational grazing (move to clean pasture every 3-5 days if possible)
2.) Multi-species grazing (cattle, sheep rotation)
3.) Avoid overgrazing (maintain 4-6 inch forage height)
4.) Keep feeders/water off ground
5.) Selective deworming (treat only animals needing it based on FAMACHA)
6.) Maintain nutrition (well-fed animals more resistant)
7.) Cull heavily parasitized animals (select for resistance)
FAMACHA Targets:
• Score 1-2: No treatment needed
• Score 3: Monitor closely, treat if other signs present
• Score 4-5: Deworm immediately
C. Seasonal Breeding Variations
Katahdin Performance in Florida:
• Can breed year-round (less seasonal than wooled breeds)
• Best conception rates: September-February
• Reduced conception: March-August (heat effects)
• May take longer to settle in summer (25 days vs 9-12 days in fall)
Recommended Breeding Windows:
• Primary: October-November (best conception, moderate weather lambing)
• Secondary: January-February (good conception, summer lambing requires extra management)
• Acceptable: April-May (moderate conception, fall lambing)
• Challenging: July-August (lowest conception, winter lambing weather moderate)
X. RECORD KEEPING
A. Heat Stress Management (April-October)
A. Essential Records (Maintain for each ewe)
Individual Ewe Record:
• Ewe ID, DOB, Dam/Sire
• Body weight
• BCS at key points: pre-breeding, mid-pregnancy, lambing, weaning
• Breeding date(s)
• Ram used
• Lambing date
• Number of lambs born (alive/dead)
• Lamb birth weights
• Lambing difficulty (easy/assisted/veterinary)
• Milk production assessment (subjective)
• Weaning date and lamb weights at weaning
• Days to rebreeding
• Health issues, treatments
• Notes on temperament, mothering ability
Individual Lamb Record:
• Lamb ID
• Dam ID, Sire ID
• Sex
• Birth weight
• Birth order (single, twin 1, twin 2, etc.)
• Vigor at birth
• Colostrum intake confirmed (time)
• Growth weights (weekly or biweekly)
• Weaning weight and date
• Health issues, treatments
• Final disposition (retained breeding stock, sold, etc.)
B. Flock Summary Records
Breeding Summary (Per Quarter):
• Number ewes exposed
• Number ewes marked (bred)
• Number ewes returning to estrus
• Conception rate
• Multiple breeding rate
Lambing Summary (Per Quarter):
• Number ewes lambing
• Lambing rate (lambs born per ewe exposed)
• Prolificacy (lambs born per ewe lambing)
• Lamb survival to 24 hours
• Lamb survival to weaning
• Dystocia rate
• Producer assistance rate
• Veterinary assistance rate
• Average birth weight
• Average weaning weight
Production Metrics:
• Pounds weaned per ewe exposed (key profitability metric)
• Feed costs per ewe
• Veterinary costs per ewe
• Labor hours per ewe
C. Seasonal Breeding Variations
When to Re-evaluate Management:
• Conception rate <80% (for fall breeding)
• Conception rate <70% (for spring/summer breeding)
• Lambing rate <130%
• Lamb survival to weaning <90%
• Dystocia rate >10%
• More than 20% of ewes with BCS <2.5 or >4.0
• Pregnancy toxemia in any ewe
• Repeated health issues in specific ewes
XI. ANNUAL HEALTH CALENDAR
January
• Breed Group A (4 ewes)
• Body condition score all ewes
• Hoof trim as needed
• FAMACHA score all
February
• Group D lambing
• Monitor Group A breeding success
March
• Group D weaning begins
• Group A mid-pregnancy check
April
• Breed Group B (4 ewes)
• CD/T booster for Group A
• Parasite control assessment (FAMACHA)
May - June
• Group A lambing
• Monitor Group B breeding success
July
• Breed Group C (4 ewes)
• Group A weaning begins
• Heat stress precautions
• Parasite control critical
August - September
• Group B lambing
• Monitor Group C breeding (expect challenges)
• Heat stress management
October
• Breed Group D (2 ewes) + rebreeds
• Group B weaning begins
• Body condition score all ewes
• Annual review and planning
November - December
• Group C lambing
• Monitor Group D breeding
• Cool weather - optimal breeding/lambing conditions
XII. FACILITY UTILIZATION PLAN
Birthing Stall Allocation (5 stalls available)
Standard Setup:
• 4 stalls for current quarter's lambing group
• 1 stall reserve for emergencies or complications
Example - May Lambing (Group A: 4 ewes):
• Stall 1: Ewe #101 + lambs
• Stall 2: Ewe #102 + lambs
• Stall 3: Ewe #103 + lambs
• Stall 4: Ewe #104 + lambs
• Stall 5: Empty (ready for emergency)
Stall Occupancy Timeline:
• Pre-lambing: Move in 24-48 hours before expected lambing
• Post-lambing: Remain 3-5 days (confirm lambs nursing, strong, ewe healthy)
• Move to monitoring paddock: Day 5-7
• Weaning age (16 weeks): Move ewe to main flock, lambs to finishing area
Monitoring Paddock Utilization (2 paddocks available)
Paddock 1: Recently Lambed Pairs (Days 5-30)
• Close observation still needed
• Protected environment
• Gradual introduction to flock dynamics
Paddock 2: Older Lambs with Dams (Days 30-120)
• Well-established pairs
• Less intensive monitoring
• More space for lamb development
Timeline Example:
• Week 1-2: Birthing stall
• Week 2-4: Monitoring Paddock 1 (intensive)
• Week 4-16: Monitoring Paddock 2 (general)
• Week 16+: Weaning, ewes to main flock
XIII. NUTRITION SUMMARY TABLE
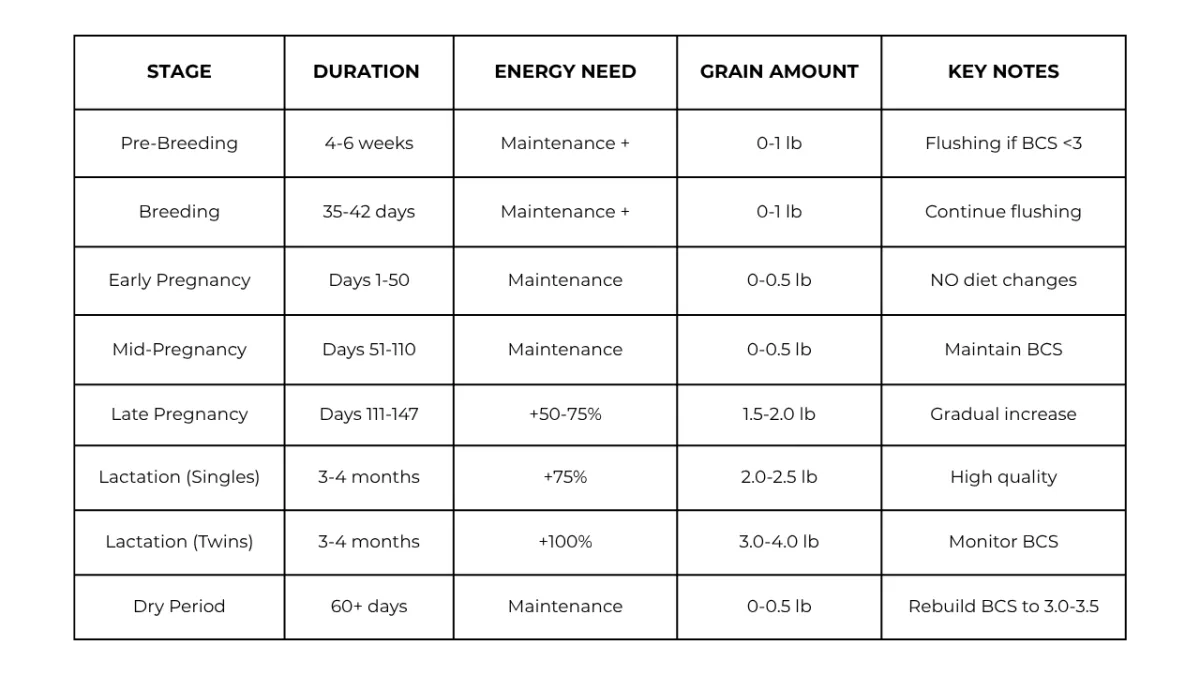
Always provide:
• Free-choice high-quality forage (pasture or hay)
• Fresh, clean water
• Free-choice mineral supplement (sheep-specific, no copper)
XIII. NUTRITION SUMMARY TABLE
Target Production Goals
Reproductive Performance:
• Conception rate: >85% (fall), >75% (summer)
• Lambing rate: >140% (1.4 lambs per ewe exposed)
• Lamb survival to weaning: >95%
• Dystocia requiring assistance: <5%
• Ewes lambing in first 17-day cycle: >75%
Growth Performance:
• Average birth weight: 8-10 lbs (twins)
• Average weaning weight (120 days): 85-100 lbs
• Average daily gain: 0.5-0.7 lbs/day
• Weaning rate: >130%
Health Metrics:
• Pregnancy toxemia: 0 cases
• Mastitis: <2% of lactating ewes
• Lamb mortality (birth to weaning): <5%
• Ewe mortality: <1%
Economic:
• Pounds weaned per ewe exposed: >120 lbs
• Feed cost per lb gained: Track and optimize
• Labor efficiency: Minimal interventions needed
1579 Walsh Street Oviedo,
Florida 32765
COMPANY
FARM SERVICES
LIVESTOCK PROGRAMS
FOLLOW US
POWERED BY:

© 2025 Black Hammock Family Farm. All rights reserved.
1579 Walsh Street Oviedo,
Florida 32765
COMPANY
FARM SERVICES
LIVESTOCK PROGRAMS
FOLLOW US
POWERED BY:
© 2025 Black Hammock Family Farm.
All rights reserved.